Special Codings for A/CLA/B/GLB! (PDF)

  •  Manual Download 
  • Thread starterrimedre
  • Start date
To activate Distronic Pro (239) via coding, the cruise control (440) and the collision warning system with FCW active braking (258) must be deactivated.
Does this mean the car will sacrifice the functionality of (440) and (258) for (239)? I'm trying to find out if this is standard on cars equipped with Distronic Pro (239).
 
  • Like [+1]
Reactions:postixer
Once you have activated Distronic Pro (239) and have completed all the coding required for it, including teaching with XENTRY, you will have an active cruise control and collision avoidance system (i.e. Distronic Pro 239).

This way you don't sacrifice any features (even if it feels like you're disabling them).
In other words, Distronic Pro has active cruise control and collision warning all in one.

I did this a while ago, it's not that hard, in fact I found instructions on this forum.
 
  • Like [+1]
Reactions:nism069 and b0snaaaa
I get some conflicting information, so I was a little embarrassed and wanted to ask. For example, I heard that the equipment cannot simultaneously support all these functions that made me think that two functions (440 and 258) were supposed to sacrifice for Distronic Pro. Nevertheless, now I know that this is not so, since all the existing functions will work after activation of Distronic Pro. Great news and thanks for the confirmation!

When Distronic Pro was retrofitted, is it easy to return everything back to how it was before? I know that I can return the coding back, but can the teaching process with Xentry make it difficult to return everything back due the calibration of the sensor?

Also, I read that to calibrate the sensor you need to reset the FCW177 to factory settings, which in turn will delete all configurations and coding done for this ECU. Therefore it is important to make a backup to save the configurations and codings for this ECU before calibration. This is the "Coding Sets" section in DTS Monaco. Is it possible to do this and save everything in an AED file? I just wanted to confirm that this is the only step required to fully backup all data for this ECU before continuing with the calibration.

Lastly, could you explain how you calibrated the sensor during the test drive? Did you monitor other vehicles and what the speed limit was?
 
I have some updates on the DP parameters testing for the Sport Plus. I've coded the DP parameters below and have been doing test drives for some of them. Here's a summary of the results so far:

DP Param SPORT_PLUS wo Lvl M2 wDriveS cw122020: Shows {SPORT, SPORT, SPORT} and produces a real effect
DP Param SPORT_PLUS cw222019: Shows {SPORT+, SPORT, SPORT+} but produces no real effect
DP Param SPORT_PLUS wDriveS cw222019: Not tested in real driving yet, but it shows {SPORT, SPORT, SPORT+}
DP Param SPORT_PLUS wo Lvl M2 AMG cw232019: Shows {SPORT+, SPORT, SPORT+} but produces no real effect
DP Param SPORT_PLUS wo Lvl M2 RideSplus cw222019: Not tested in real driving yet, but it shows {SPORT, SPORT, SPORT+}
DP Param SPORT_PLUS wo Lvl M2 cw232019: Shows {SPORT+, SPORT, SPORT+} but produces no real effect
DP Param SPORT_PLUS wo Lvl M2 wDriveS cw222019: Not tested in real driving yet, but it shows {SPORT, SPORT, SPORT+}

I still need to check the NTG6 DP parameters, except for NTG6 DP Parameter SPORT_PLUS AMG X1 cw143017, which rimedre recommended first. I plan to check them another day.

I hope this information will be useful to others.

Very useful info, thanks for sharing!

I dug a little deeper so I will also share my findings as they can be useful to others. Basically each driving program consists of a set of 16 bytes with each byte controlling a different parameter, e.g. Steering, ESP, Drive, etc.
While some bytes are always blank, comparing the different available driving programs for each driving mode I was able to reverse engineer what some of the bytes controlled.

Regarding Sport Plus on my A250e, the best option available from the dropdown is not DP Param SPORT PLUS wo Lvl M2 wDriveS cw122020 but rather NTG6 DP Parameter SP wo Lvl M2 wDriveS cw432018 which is exactly the same apart from the byte that controls the ESP (byte 8), with the latter having Sport Plus instead of Sport.

With manual coding I was able to modify the byte that controls the Steering (byte 1) of NTG6 DP Parameter SP wo Lvl M2 wDriveS cw432018 so that it activates Sport Plus Steering as well. On my car this is the best setting, and as an added bonus it seems to charge my battery a little while driving too!

Byte 6 controls the Drive mode, and on my engine Sport Plus does not work, it just basically reverts to the Drive mode of the previously selected program, for instance if before selecting Sport Plus I was on Electric it changes to Sport Plus program but will remain with the pure electric drive mode.

See attached. XLS file for better understanding, I left comments with my insights in the column header of each byte, maybe someone can find further settings!

A couple more useful codings related with driving programs:

1. Re-ordering the driving program list:

In HU6 -> Drive Program Data Matrix Write -> You can change the meaning of 'Drive Program HMI Usage Order Row' of each of the programs to the number you wish them to appear (1 for first, 2 for second and so on...)

2. Adding more Individual Program Configuration parameters (e.g. Sport Plus Steering/ESP & Snow ESP)

In HU6 -> Drive Programs Individual Settings Write

Driving Program Individual ESP SPORT_PLUS -> On
Driving Program Individual Steering SPORT_PLUS -> On
Driving Program Individual ESP SNOW -> On

 
Download attachments
  • Driving_Program_Analysis.zip
    External link · Views: 10
  • Like [+1]
Reactions:lordmetro, marcel13000 and aammjj31
There is a special AMG emulator module to connect to the car to activate the AMG Supersport screen. But I have never tried it. But if you want to try it yourself, I will leave a link here.

Do you know what coding we need after installing this emulator?
 
Once you have activated Distronic Pro (239) and have completed all the coding required for it, including teaching with XENTRY, you will have an active cruise control and collision avoidance system (i.e. Distronic Pro 239).

This way you don't sacrifice any features (even if it feels like you're disabling them).
In other words, Distronic Pro has active cruise control and collision warning all in one.

I did this a while ago, it's not that hard, in fact I found instructions on this forum.

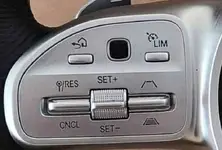
Could you share a photo of the steering wheel buttons you purchased for the Distronic Pro retrofit?
 
You will need these buttons for Distonic Pro.
 
Download attachments
  • IMG_5528.png
    IMG_5528.png
    318.8 KB · Views: 26
  • Like [+1]
Reactions:b0snaaaa
To retrofit the Distonic Pro, is it enough to replace only the panel shown in the picture? I would like to confirm that there is no need to replace both steering panels as my car already has another one with media controls, voice functions and navigation.
Lastly, I noticed that the OEM part number for the panel in the picture may vary depending on the vehicle. Does this matter? I want to be sure that any panel with the same button layout will work, even if the OEM number is different.
 
Sharing a few additional codings:

Enable Acoustical Lock (some countries might not have this option enabled by default, my car was imported from Germany and didn't)

BCMFA2 -> (008) HRN Parameter Write -> PHRN_Acust_Lk_Rq_Enbl_en -> HU
HU6 -> (056) Vehicle Functions Write -> Acoustical Locking Indication -> available

Enable Browser In Motion

HU6 -> (080) Restricted Functions Write -> RF_Browser -> Never restricted

Also sharing below coding to retrofit power folding, auto-dimming mirrors with puddle lights, for this you obviously need to replace parts, but since it can help others taking on the project I'll leave it here:

Retrofit Power Folding mirrors

EZS167 -> (004) EVC CfgBit_65_96 Write -> 500 OUTSIDE REAR VIEW MIRROR LH AND RH FOLDING -> ja

HU6 -> (056) Vehicle Functions Write ->
- Exterior mirror convenience -> installed
- CarWashMode -ExtMirror -> available

DMFL177 & DMFR177 ->
(019) OM-Spiegelklappung Write -> Gehäuseklappung beginnt bereits bei Entriegelung -> on (if off mirrors only start unfolding when doors are opened)
(021) OM-Modellierte Parameter EMC Write -> Einklappen beim Verriegeln verfügbar -> on

*If the mirrors you're retrofitting also have puddle lights you also need to code below in the door modules, if not you can skip*
(003) Parametrierung Leuchten Write ->
- Ausstiegs-/Warnleuchte mit Glühbirne -> nein
- Einstiegsleuchte mit Power-LED -> ja
(004) Bandendeprogrammierung DAG Write ->
- Ausstiegs-/Warnleuchte vorhanden -> ja
- Einstiegsleuchte im Außenspiegel vorhanden -> ja

*If the mirrors you're retrofitting also have 360' camera I believe you need to code the below in PARKMAN213 but cannot confirm *
PARKMAN213 -> (015) Functional Settings Write ->
- SVS: Side Cameras Folding Type -> Horizontal Folding Available
- SVS: Exterior Light Control -> Available

Retrofit Auto Dimming Interior and Exterior Driver Side Mirrors (auto dimming interior mirror is needed to control the exterior ones)

OHCM177 -> (001) VARIANT_CODING Write -> HSD MIRROR SUPPLY -> yes
DMFL177 / DMFR177 -> (004) Bandendeprogrammierung DAG Write -> Spiegelabblendung vorhanden -> on

I have also tried retrofitting the passenger side auto dimming mirror, but despite adding the mirror, wiring, the door module having the PINs and coded, it still didn't work for some reason, if someone was able to do this please let me know, maybe I'm missing something.
 
  • Like [+1]
Reactions:aarmdlr, marcel13000, Hzr and 1 other person
I would appreciate it if someone could help me set up Distronic Pro on my car.

I received the original Distronic Pro buttons with white backlight and installed them. Then I did the coding as shown below. Between each step below I made a backup by exporting the coding using DTS Monaco.

1. Disabled "Cruise Control" (440) and "Forward Collision Warning" (258), then enabled "Distronic Pro" (239) in EZS167.
2. Activated "Distance Pilot DISTRONIC" in FCW177.
3. Made "Reset Automatic Initial Alignment Start" in FCW177.
Please note that I did not perform a "Set ECU to Delivery State" as other guides on this forum do not require it.
4. I tried to re-import the coding parameter saved in step 2 for FCW177, but "Do Coding" was disabled, probably because the coding was not changed in step 3. To solve this problem, I temporarily disabled "Distance Pilot DISTRONIC", ran "Do Coding", then re-imported the saved coding option and ran "Do Coding" again to make sure all settings were fully restored.

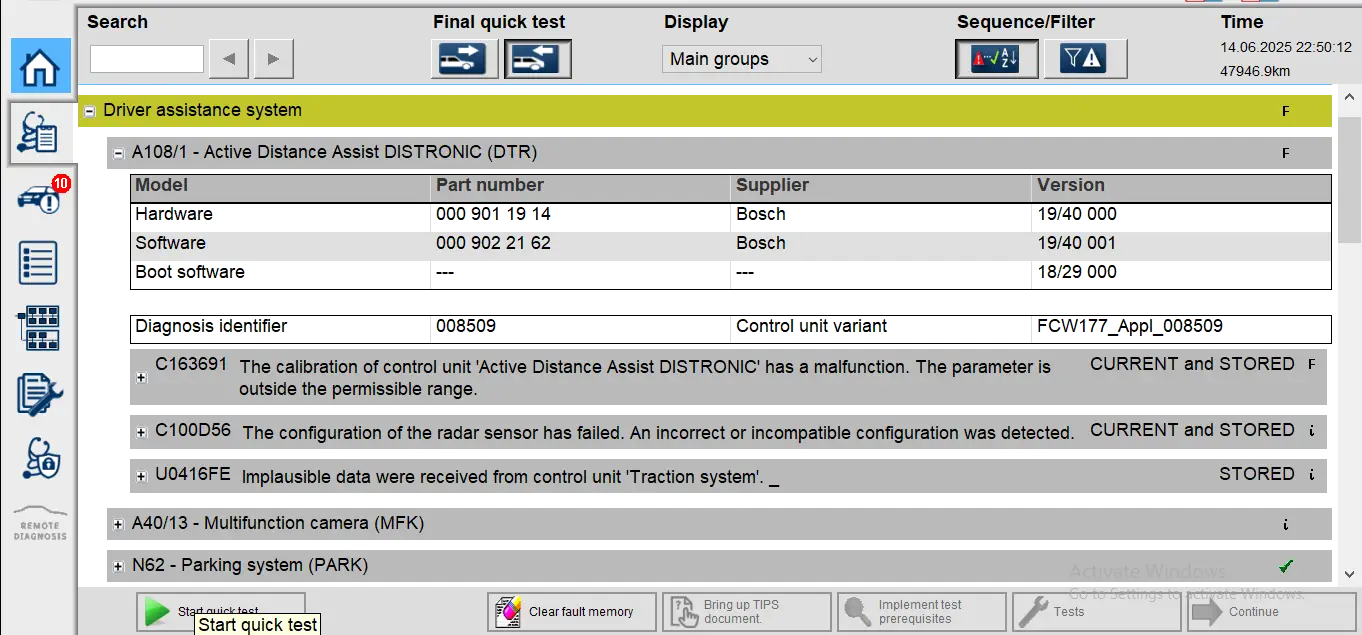
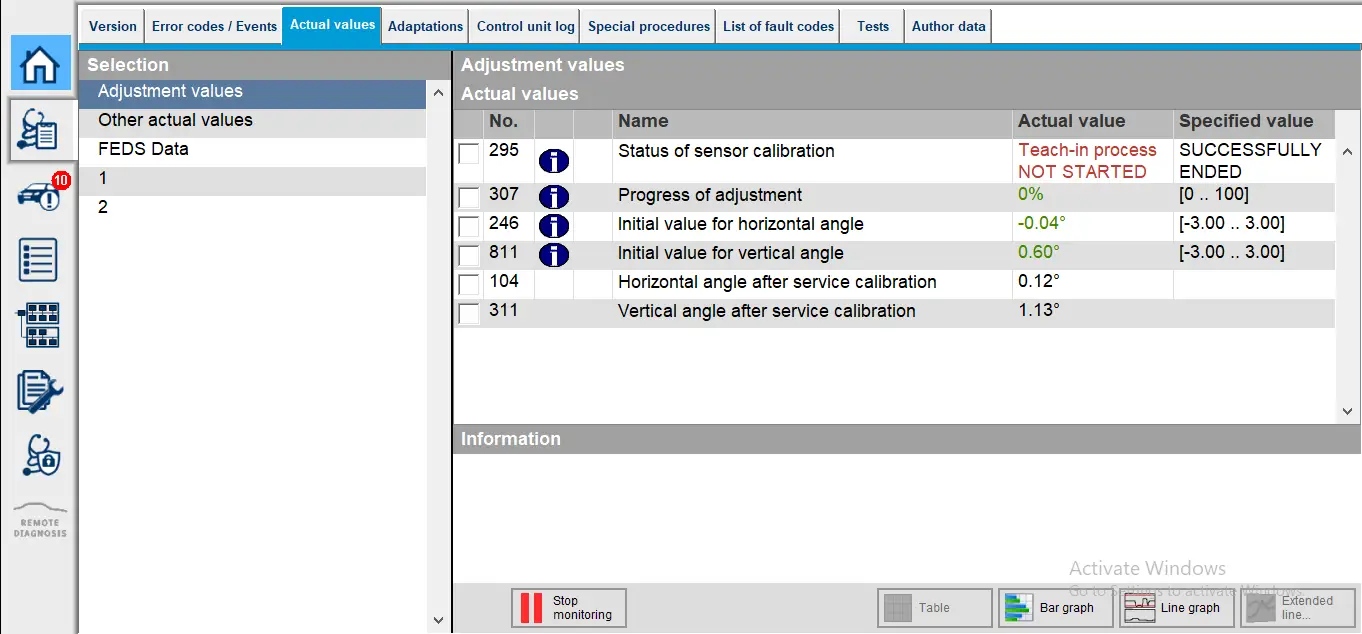
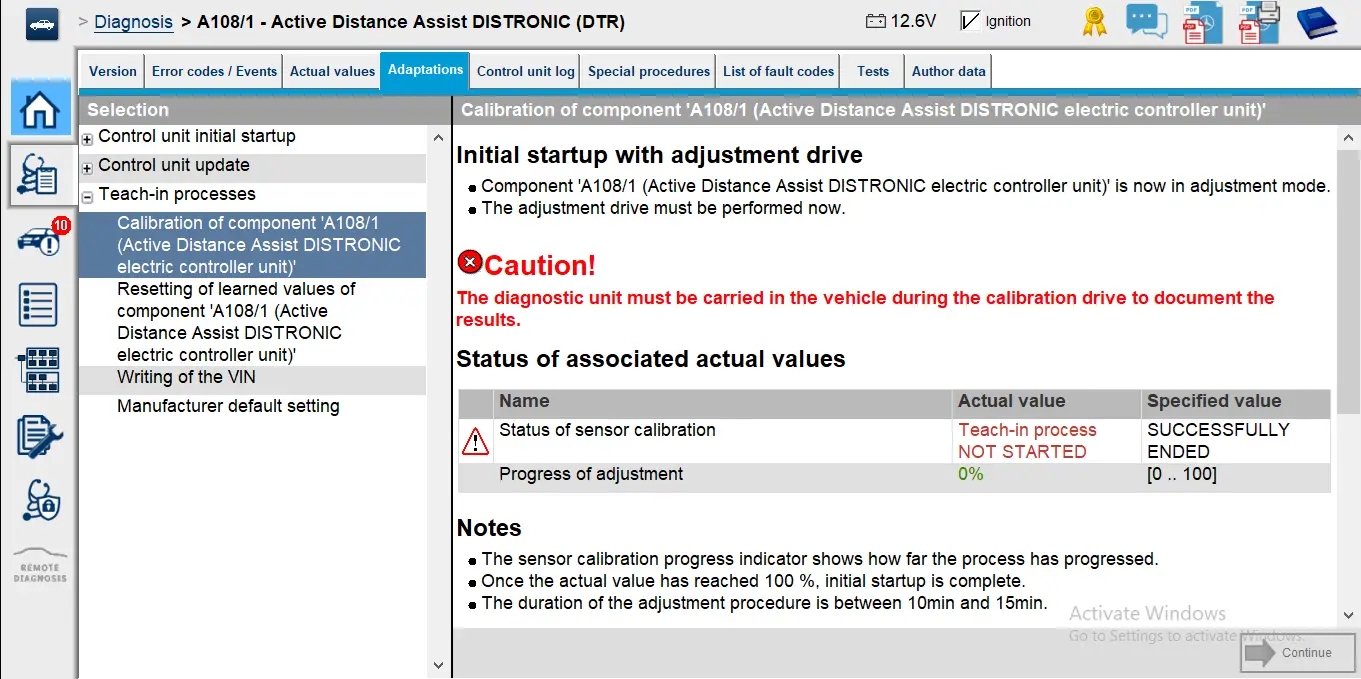
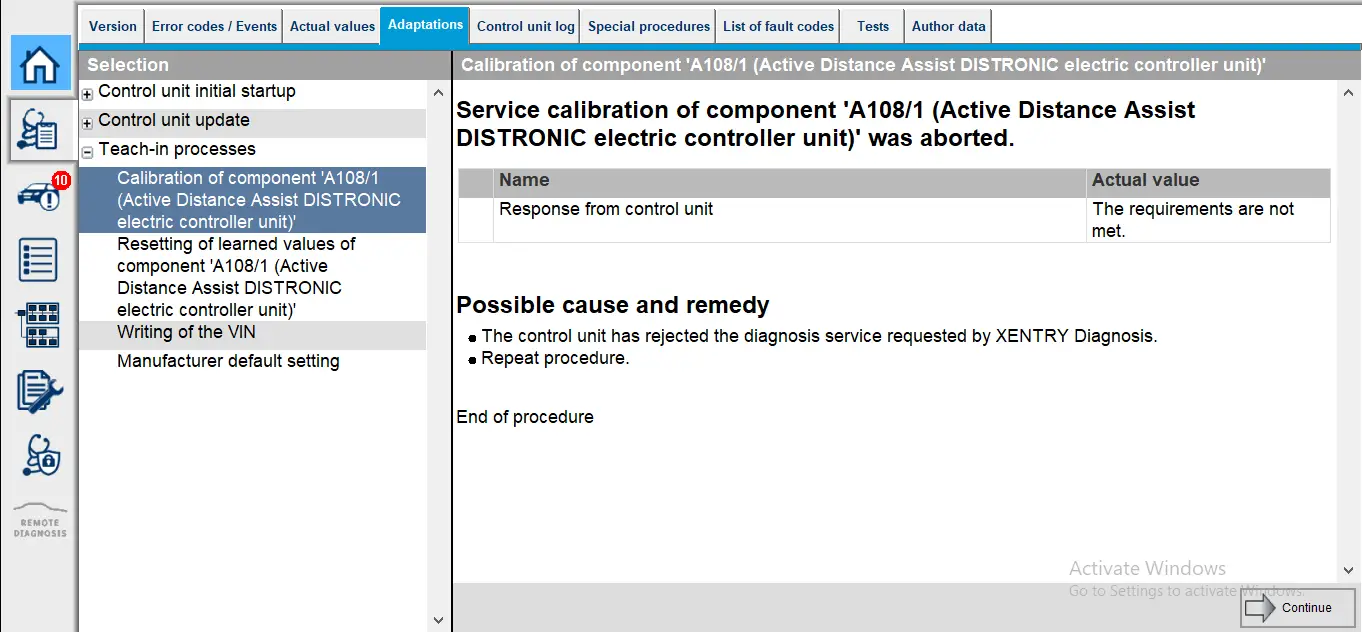
Now when I try to calibrate via Xentry under "Adaptations" for "Active Distance Assist DISTRONIC (DTR)" it doesn't let me continue. It just says "The requirements are not met" without any further details. The sensor calibration status shows "Teach-in process NOT STARTED" which I think is expected at this point. However, I can't get it to go into "RUNNING" mode or start calibration.

Could this be due to the battery voltage being below the required 12.5V? Below I have attached screenshots where at some point the voltage was 12.6V.

1749936288774
1749935808233
1749932540411
1749935931517
 

Similar threads

R00TR0w
  • Sticky
  • R00TR0w
  • Marketplace
Replies
0
Views
348
R00TR0w
R00TR0w
ucmb
  • ucmb
  • Diagnostic and engineering software
Replies
0
Views
4K
ucmb
ucmb
G
  • GanPower
  • Diagnostic and engineering software
Replies
0
Views
2K
GanPower
G
Back
Top Bottom